
You're reaching for the same bottle all day, and then you spot the dark specks, the sour smell, or that slimy ring around the lid. In humid South Florida homes, how to remove mold from water bottle isn't a niche cleanup trick, it's the difference between a bottle you can trust and one that keeps feeding moisture back into your routine.
Table of Contents
- Why Mold Shows Up in Water Bottles So Often
- The Core Method That Works on Most Bottles
- Cleaning the Lid, Straw, and Seals Most People Skip
- Choosing Between Vinegar, Bleach, Baking Soda, and Boiling Water
- When to Toss the Bottle Instead of Saving It
- Preventing Mold From Coming Back in Daily Use
- Bringing It Home With a Cleaner Routine
Why Mold Shows Up in Water Bottles So Often
A Boca Raton parent fills a bottle in the morning, sets it in the car, and by afternoon the cap still has a damp smell. That same moisture problem shows up on shower grout, window sills, and AC vents across Palm Beach County. A quick rinse does not reach the seams, and mold takes advantage of leftover water that stays trapped in lids, straws, and threads.
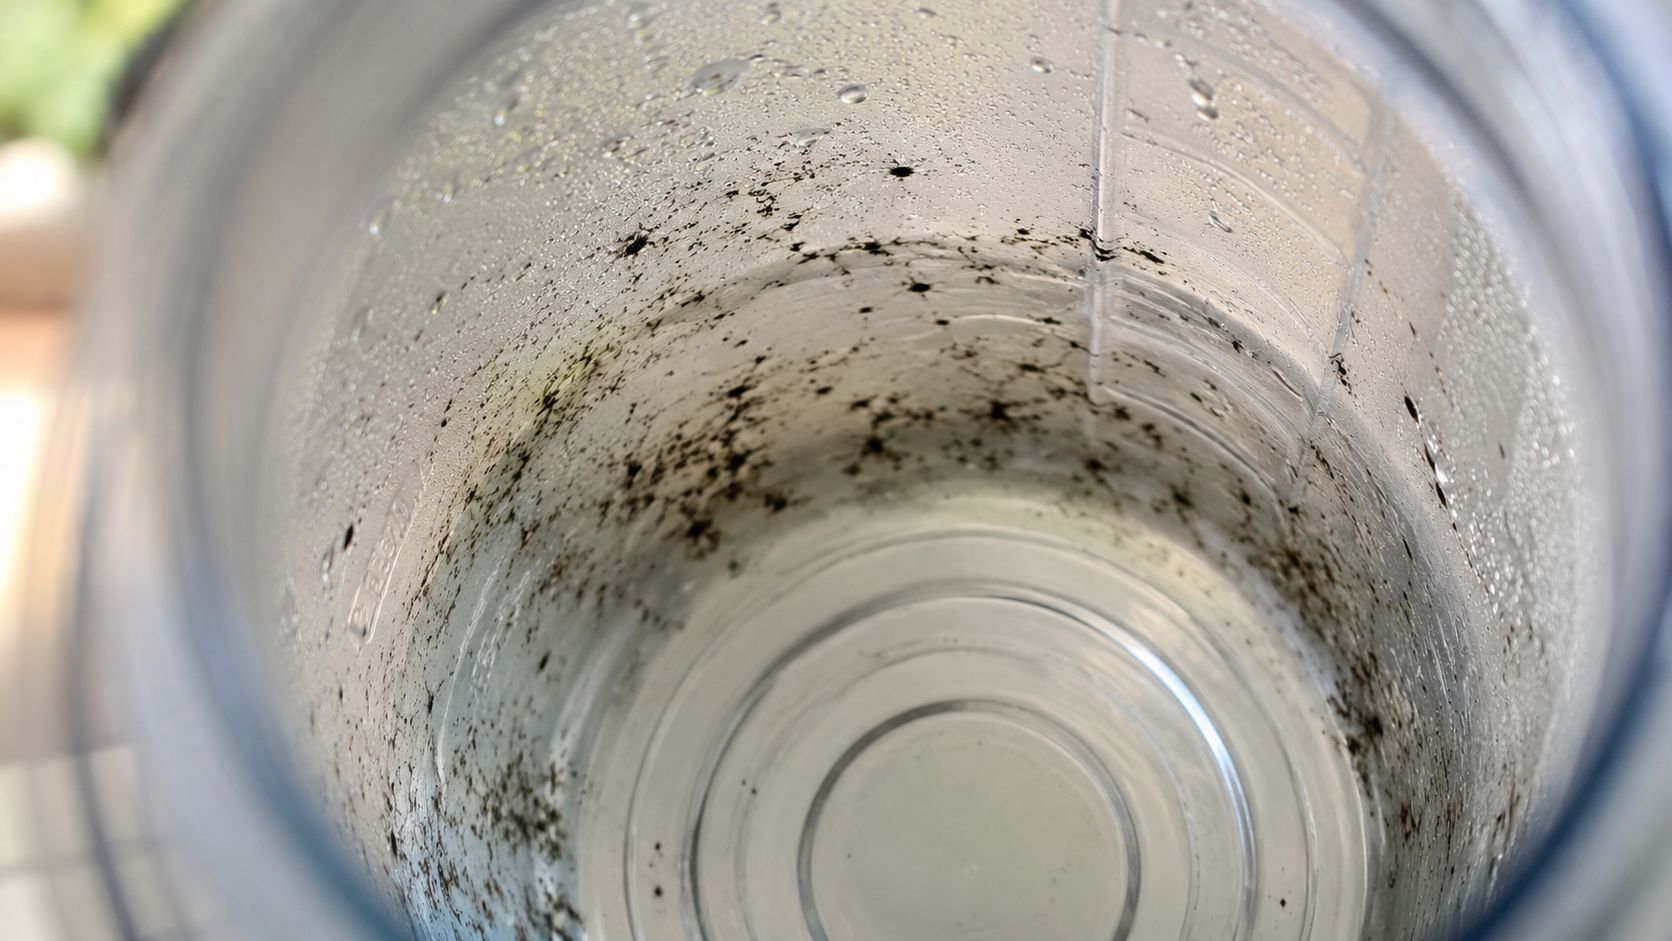
Humidity makes the problem worse because moisture lingers after every use. In South Florida, that means a bottle can stay damp long enough for growth to start in the places you do not see, especially around caps, mouthpieces, and gasket grooves. The same moisture-heavy conditions that drive mold problems at home also make water bottles harder to keep clean between refills.
The bottle has to be treated like a full drinking system, not a single container. Mold commonly hides in seams, caps, and mouthpieces where water and residue stay stuck after a quick wash. That is why a bottle can look fine on the outside and still have a sour smell or visible spots inside the lid.
Practical rule: if a bottle has detachable parts, each piece needs its own attention.
Sugary drinks make the problem harder because residue clings to threads and silicone pieces. In a humid climate, that residue stays damp longer, so the same bottle can look clean outside and still harbor mold inside the cap. That is the reality I see in homes from Boca Raton to Jupiter, and it is the same moisture-driven pattern a cleaning service handles in kitchens, bathrooms, and other trouble spots countywide.
The Core Method That Works on Most Bottles
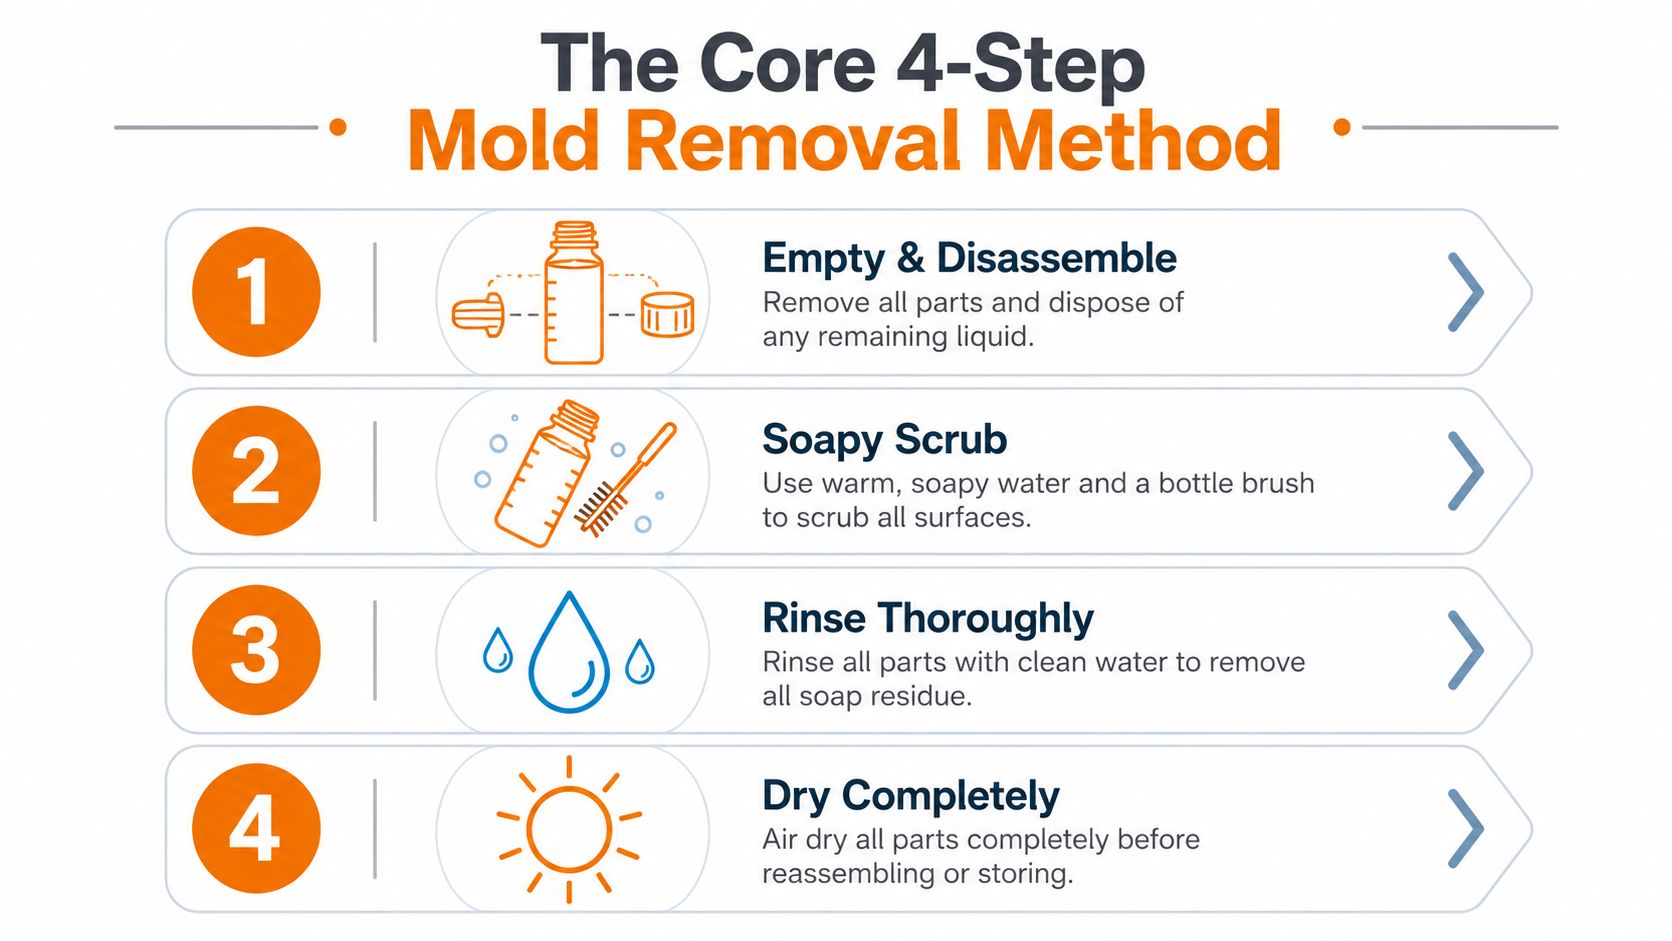
The most reliable process is simple, but it has to be done in order. Empty the bottle, take it apart, scrub every reachable surface, rinse thoroughly, then dry it completely. Cleveland Clinic recommends liquid dish soap, a bottle brush, warm water for rinsing, and full air-drying after cleaning, while Better Homes & Gardens says to scrub the outside and base too, then let everything dry fully before reassembly. That matches what works in real kitchens from Jupiter to West Palm Beach.
What to do first
Start with the parts that come apart. Lids, straws, seals, and any removable inserts should be separated before the bottle touches the sink. A brush with a narrow neck and stiff bristles is the tool that reaches the bottom, corners, and shoulder of the bottle, which is where mold tends to linger after a quick wash.
For deeper cleaning, an equal-parts vinegar-and-water soak can sit overnight, according to Better Homes & Gardens, and Cleveland Clinic also suggests vinegar as an extra deep-clean step after scrubbing. Southern Living reports bleach methods using 1/3 cup of bleach per 1 gallon of water or 4 teaspoons per 1 quart of water, with a six-minute soak for bottles and nonporous parts Southern Living. The point isn't to use the harshest product, it's to use the right one for the material and then rinse it out completely.
Why drying matters most
A bottle that stays wet is a bottle that stays at risk. Dry it upside down, uncapped, and separated so air can move through every part. Better Homes & Gardens specifically calls for complete drying to prevent regrowth, and that's the step many people skip when they're rushing out the door.
Cleaning the Lid, Straw, and Seals Most People Skip
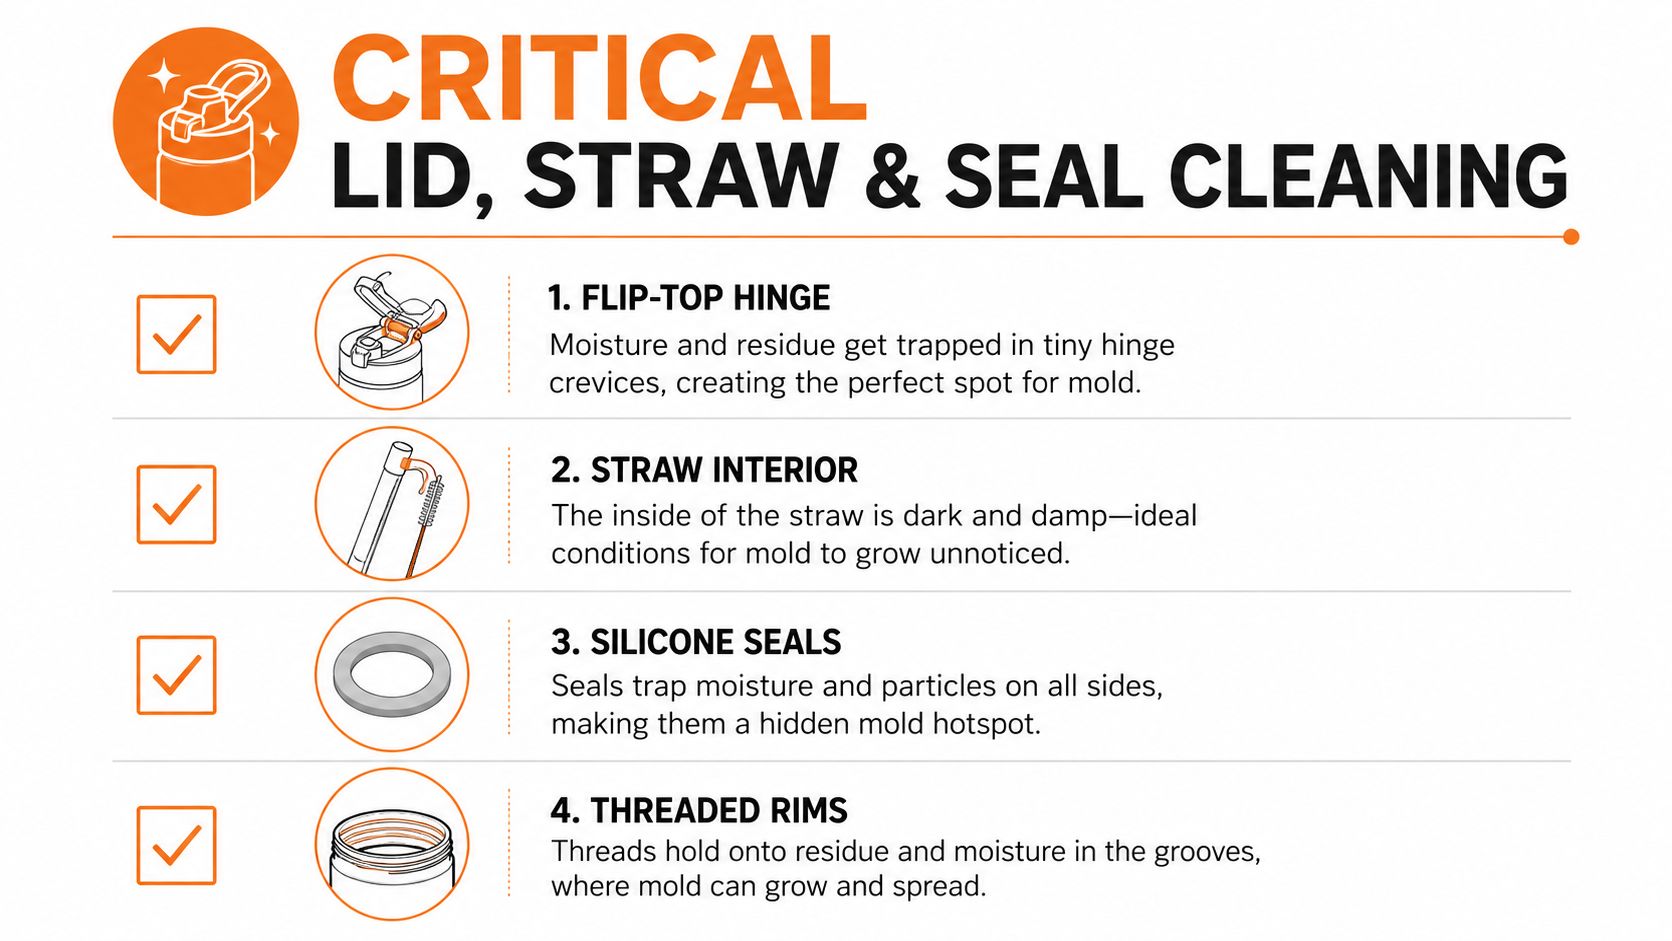
The body of the bottle is usually the easiest part to clean. The problem lives in the cap hardware. Modern Home Tools says to inspect the cap, threading, and seal for residue, then clean them with a small brush or sponge, and another guide says to scrub the lid, straw, and seams thoroughly, then store bottles and lids separately with airflow rather than sealing them tightly. That lines up with what shows up most often in Palm Beach County homes, where the cap dries last and the hidden pieces stay damp longest.
Hidden spots that hold on to mold
Flip-top hinges, straw interiors, silicone gaskets, and threaded rims are the repeat offenders. If the gasket pops out, remove it and wash both sides. If the straw comes apart, run a straw cleaner through the center, then check the ends for discoloration or residue.
The bottle can look spotless while the seal is still holding the problem.
A small brush matters more than fancy products here. Use it on the threads, hinge edges, and the underside of the lid where residue builds up. If there's a rubber ring, clean the groove it sits in, because trapped moisture in that channel is exactly why mold comes back after a basic wash.
What to store separately
Lids and bottles should dry apart, not snapped together. Airflow helps more than tight storage, especially in a humid house or an Airbnb that turns over fast between guests. If the cap still smells musty after cleaning, the bottle isn't really finished yet.
Choosing Between Vinegar, Bleach, Baking Soda, and Boiling Water
A bottle full of mold in South Florida calls for the right fix, not the strongest one. Humidity in Boca Raton, Jupiter, and the rest of Palm Beach County keeps moisture hanging around longer than it should, so the cleaner you choose has to match the bottle material, the type of buildup, and how stubborn the odor still is after scrubbing. Vinegar works well for many everyday cleanups, bleach is better reserved for nonporous parts with heavier contamination, baking soda helps with odor, and boiling water only belongs with metal bottles. The wrong choice can warp plastic, damage seals, or leave residue behind.
Bottle Mold Removal Methods Compared
| Method | Mix Ratio | Dwell Time | Best For |
|---|---|---|---|
| Vinegar | Equal parts vinegar and water, or a vinegar soak as directed | 30 minutes to overnight Cleveland Clinic, Ultra Fresh | Light odor, routine deep cleaning, stubborn smell |
| Bleach | 1/3 cup per 1 gallon or 4 teaspoons per 1 quart Southern Living | Six minutes on bottles and nonporous parts, or 10 to 15 minutes in step-by-step methods with heavy rinsing Southern Living | Nonporous bottles and parts with serious buildup |
| Baking soda | Mild paste or deodorizing soak | No fixed dwell time in the verified guidance | Odor control after cleaning |
| Boiling water | Plain boiling water | 15 minutes for stainless steel bottles Southern Living | Metal bottles only |
Bleach needs respect. Another cleaning method uses a 1 teaspoon per 1 litre bleach solution with a 10 to 15 minute contact time, followed by at least 5 rinses, which shows how much rinsing matters after disinfection Southern Living. That makes bleach a targeted fix, not a casual all-purpose one, and it is a poor match for bottles with delicate seals or plastic parts that can hold onto residue.
Vinegar is the practical everyday fallback for many bottles, especially when the smell lingers after washing. If you want a gentler approach for routine odor control, this vinegar and baking soda cleaning guide fits the same idea, but it still depends on scrubbing to remove what the soak loosens. In humid homes, that extra scrubbing matters because trapped moisture around the cap and threads is the same kind of problem that shows up in kitchens and bathrooms after a day of wet weather.
When to Toss the Bottle Instead of Saving It
Some bottles aren't worth one more round in the sink. If mold stays in deep scratches, the plastic looks cloudy, the seal is cracked, or the odor comes back right after cleaning, replacement is the smarter move. A bottle that keeps holding smell and discoloration after repeated cleaning is telling you the surface has become too compromised to trust.
Signs the bottle should go
- Deep scratches or etched plastic: Mold can settle into damaged surfaces where brushes can't fully reach.
- Persistent odor after cleaning: If the smell survives a proper scrub and soak, the material is holding onto residue.
- Cloudy or worn plastic: That usually means the surface has aged enough to trap grime more easily.
- Cracked lids or seals: Once the seal is damaged, moisture stays in the same place every day.
- Quick mold return: If it's back within days after a thorough clean, the bottle is no longer a good candidate for rescue.
For metal bottles, corrosion or bad denting can create the same problem. In humid homes, a compromised bottle keeps acting like a tiny damp storage container, and that's not worth fighting forever. Tossing it isn't wasteful, it's just the same judgment call a homeowner makes with a water-damaged item that no longer cleans up properly.
Preventing Mold From Coming Back in Daily Use
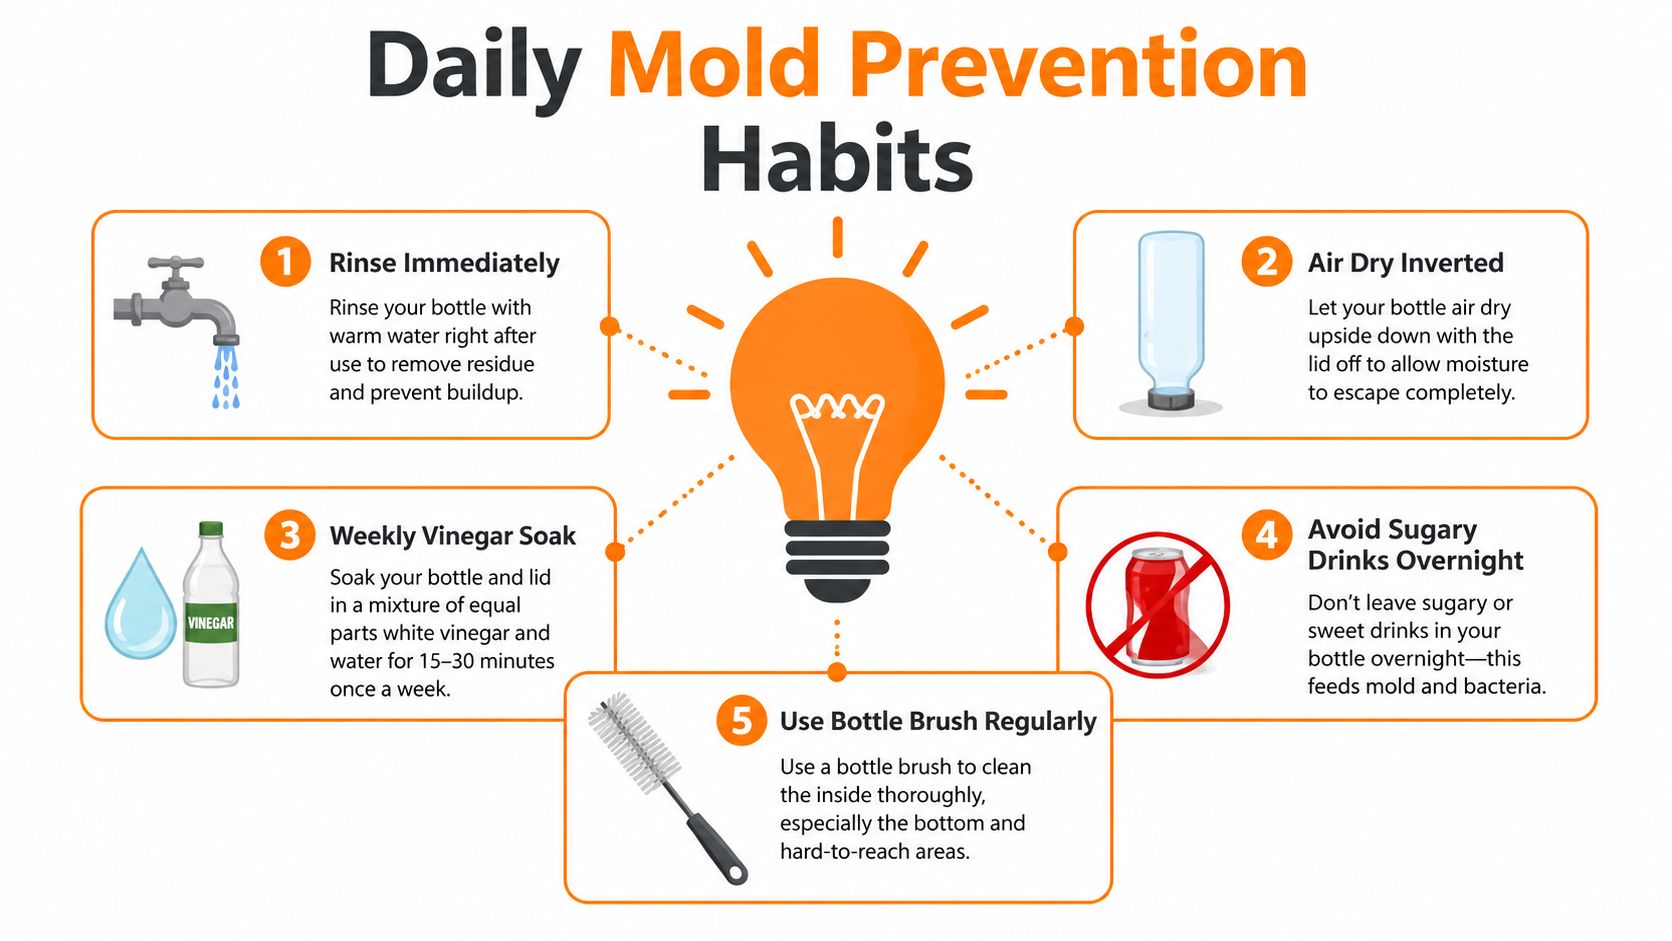
The best defense is a short routine that fits real life. Rinse the bottle as soon as it's empty, leave the cap off, and let it dry upside down before it goes back in a bag or cabinet. The bottle brush still matters, especially if the bottle held anything other than plain water.
Daily habits that actually help
- Rinse immediately: Don't let residue sit through a hot Florida afternoon.
- Air-dry inverted: Keep the lid off so the interior can breathe.
- Keep sugary drinks out overnight: Sweet residue gives mold more to hold onto.
- Use the brush every day: A quick scrub prevents buildup at the bottom and neck.
- Store parts separately: Let lids and bottles dry with airflow.
A weekly vinegar soak makes sense for many households that use the same bottle all week, especially in humid homes where everything dries slower. For a deeper maintenance routine, see mold prevention strategies.
Practical rule: if the bottle has to go into a gym bag, dry it first. A damp bag is the same as a warm storage box for mold.
That advice matters just as much for renters and Airbnb hosts as it does for homeowners. Tight turnarounds leave less room for mistakes, so the bottle has to be clean, dry, and stored open before it goes back into service.
Bringing It Home With a Cleaner Routine
The safest way to handle how to remove mold from water bottle is still the same: separate the parts, scrub with friction, use vinegar or bleach only where appropriate, rinse well, and dry everything completely. That same moisture control is what keeps bathroom grout from spotting up, window sills from staining, and kitchen corners from going musty in Palm Beach County homes.
South Florida humidity shows up fast, and it doesn't stay in one place. If you're already dealing with moldy bottles, the rest of the house may need the same kind of attention around sinks, showers, and other damp spots.
A CTA for Sunset Shine Home Cleaning. Book your cleaning with Sunset Shine Home Cleaning, your trusted house cleaning service in West Palm Beach. Call 561-408-4020 or book online, sunsetshinehomecleaning.com